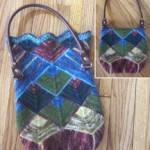
When making a felted bag or even a felted hat, often you just jump in, knit it up (real big!), toss it in the washer and take your chances.
However, fulling – felting – a larger garment that is suppose to FIT A HUMAN BODY after everything is said and done, involves a leap of faith. And Math.
Why, here’s a video I made on how I felt my Universal Mitered Handbag (part of my UMH online class) that explains the process quite nicely – and amusingly…
Gauge
We’ve all experienced the situation where we do a quick gauge swatch (usually in the yarn shop) buy the yarn and go home only to discover that the gauge on the actual garment is markedly different. Or the gauge is different from section to section on the garment.
This is hand knitting, folks, this is going to happen. Unless we’re machines or dieties (and we’re neither) our gauge is affected by many things – not least of which is our mental state as we’re knitting.
Gauge happens.
This is one reason that LARGE gauge swatches are very important (I don’t make gauge swatches smaller than 9″ square, usually more like 15″ square).
It’s also a reason that it’s vital to swatch using the same needles you’ll be using on the project, and knitting in the same method you’ll be using (if the garment is to be knit in the round, SWATCH it in the round!)
Gauge & Felting
When felting gauge is a changeable thing.
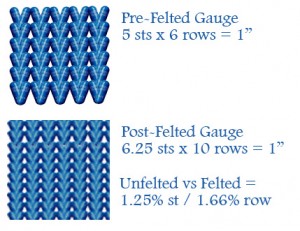
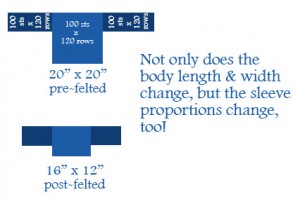
We all know that our stitch and row gauge is usually different, and I tell folks that unless they’re knitting a sweater from cuff to cuff the stitch gauge is more important than the row gauge. But when you felt something the stitch and row gauge changes even MORE.
It’s necessary to take this into account when figuring the final size of the garment – the rows and stitches will shrink in different proportions, the % of the shrinkage will be different.

And this means that the actual non-felted garment may look rather bizarre when knit up, before felting.
Circular Logic
I’ve just finished working up a felted circular garment (I did the felting live in real time via Twitter, it was very exciting…) based on a painting by Tissot.
I worked it up using Imperial Ranch Pencil Roving, which – until you get used to it – is kind of a bear to knit with (you have to treat it GENTLY – it becomes easier!)
This yarn felts better than just about anything I’ve knit with, though, so it’s well worth the learning curve!
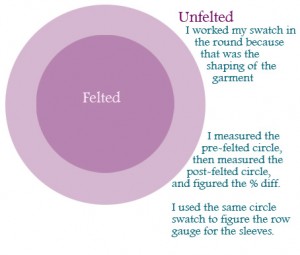
Since the garment was to be knit in the round, I worked my swatch in the round. This gave me a better understanding of what the pre vs. post felted measurements would be, and how to figure my shrinkage percentages.
Because the row and stitch gauge changes during felting, the whole pi thing (diameter x pi = circumference) can get a little surreal – but it actually DOES work!
This garment had the extra, bonus wrinkle of a cabled edging which was not worked in the round, but worked along the edge of the circle. THAT was bit of a headache, and I’m not entirely sure I have it perfect, but I’m happy with it. I’ve tweaked it in the test pattern so I’ll see if my tweak garners the correct results.
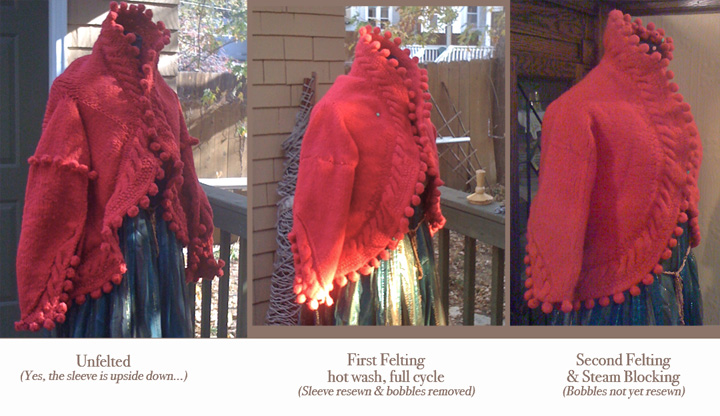
This garment required TWO feltings, I’ve found that’s the case with a lot of items. The first pass shrunk it up nicely, but it didn’t have the compactness that I was looking for.
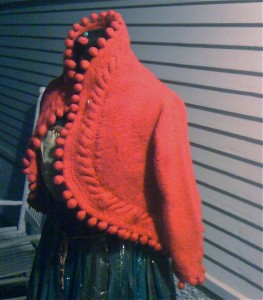
So I felted it a second time, then I attacked it with my steamer (a steam iron would work well, too) and manipulated the hot, wet wool into the shape I needed.
Most of the steam block shaping took place at the armhole opening (forcing the top of the sleeve a bit wider) and at the cuffs and edges (making the cables look nicer, the edge smoother and the bobbles a bit rounder)
I can’t deny this was a fun knit. Now that I’ve worked it up AND I see that my math works, I definitely want to make one in my size for me.
It’s a long knit, and you have to pay attention (there are two different short row passes to create the oval garment with the bust shaping) but with stitch markers all things are possible…
Mistakes
My mind has NOT been as clear as I would have liked – which actually may have been a good thing as it forced me to take copious notes of every step of the process as I worked. The sleeve cuff openings are placed along the center back line of the sleeve, and I placed my first one correctly.
Then I rode my bike to have coffee with a friend and convinced myself that I’d put the opening in the wrong place, so I cut the sleeve apart and kitchner stitched it back together. And I worked the other sleeve to match.
THEN I finished the garment and placed it on the mannequin and saw that – yes – I was right in the first place. Dang.
So I cut the sleeves off AGAIN and kitchner stitched them back on. After the felting it’s not terribly apparent, but it IS noticeable.
I would NOT suggest that this is the route anyone else takes in the working up of this garment. And don’t make decisions about a garment after biking 8 miles on a cold day.
I also wasn’t happy with the bobble placement – that’s why they disappeared in the photo above. I cut them off when re-stitching the sleeve, tossed them in the washer so they’d felt, too, and have yet to sew them back on. I’ve tweaked this in the pattern so the bobbles fall higher up the sleeve, so I think this will resolve this issue.

This jacket is gorgeous!! I wish I could see it in person.
Lovely jacket! I understand why you want to put the bobbles back on the sleeves after looking at the picture again, after all the book is “History on Two Needles”. I like it as is, without bobbles on the sleeves. Although should my knitting abilities ever rise enough for me to make this jacket, I guess it would be my choice to leave them off.
Very interesting! I love these kind of posts that peak inside the design process. Gorgeous jacket!
Those jackets are beautiful– both your rendition and Tissot’s. I like it better without the bobbles at the top of the sleeve, though; that seems like overkill (so typical of the period, of course).
Annie,
You are an amazing designer! This little jacket is fabulous. Can’t wait for you to finish this book.
I want to wear this SO MUCH, you have NO IDEA.
I really want to make one in my size – we’ll share it at TNNA!
Such a beautiful jacket!! Your designs are always original, classical but with a modern sensibility as well and always look wearable. Some designs I see in magazines and from individual designers don’t look like they were ever intended to be worn, but your garments look beautiful and comfortable for just about all body types. Great talent to do that!
Thank you Nora, your kind comment means a great deal! That’s exactly what I strive for when I design.